• Skip to primary navigation
  • Skip to main content
  • Skip to primary sidebar

The Newsletter Life

A blog about newsletters

  • Home
  • About Me
  • Contact Me
  • Top Newsletters
  • Newsletter Review

Matt Brady

How to Create a Newsletter on Google Docs: A Step-by-Step Guide

November 11, 2023 by Matt Brady Leave a Comment

Creating a newsletter can be a great way to keep your audience informed and engaged with your brand or organization. However, designing and distributing a newsletter can be time-consuming and challenging, especially if you don’t have the right tools. Google Docs is a free and user-friendly platform that can help you quickly and easily create and distribute your newsletter.

To get started, you’ll need to create a new document in Google Docs and choose a template that suits your needs. Google Docs offers a variety of newsletter templates that you can customize with your own text, images, and branding. Once you’ve selected a template, you can add your content and format your newsletter to make it visually appealing and easy to read.

One of the benefits of using Google Docs for your newsletter is that it allows you to collaborate with others in real time. You can share your document with team members or colleagues and work together to create a newsletter that reflects your brand’s voice and messaging. Additionally, Google Docs makes it easy to share your newsletter with your audience via email or social media, so you can reach a wider audience and keep them engaged with your brand.

Getting Started with Google Docs

Google Docs is a free, web-based word-processing program that allows users to create and edit documents online. It is a great tool for creating newsletters because it allows multiple users to collaborate in real time. Here are a few steps to get started with Google Docs:

  1. Create a Google Account: If you don’t already have a Google account, you will need to create one. Simply go to the Google homepage and click on “Sign In” in the top right corner. Then click on “Create an account” and follow the prompts.
  2. Navigate to Google Docs: Once you have a Google account, navigate to Google Docs by clicking on the grid icon in the top right corner of the Google homepage and selecting “Docs” from the drop-down menu.
  3. Create a New Document: To create a new document, click on the “Blank” option under “Start a new document” or select a pre-made template.
  4. Add Content: To add content to your newsletter, simply start typing in the document. You can also copy and paste text from other sources, such as a previous newsletter or a website.
  5. Format Your Newsletter: Use the formatting tools in the toolbar to format your newsletter. You can change the font, font size, color, alignment, and more.
  6. Add Images: To add images to your newsletter, click on “Insert” in the top toolbar and select “Image.” You can upload an image from your computer or search for images in Google.
  7. Share Your Newsletter: Once you have finished creating your newsletter, you can share it with others by clicking on the “Share” button in the top right corner of the document. You can choose to share the document with specific people or make it public.

Overall, Google Docs is a user-friendly tool that can help you create professional-looking newsletters quickly and easily.

Creating a New Document

To create a newsletter on Google Docs, the first step is to create a new document. Here are the steps to follow:

  1. Open Google Docs in your web browser and sign in to your Google account.
  2. Click on the “Blank” document option to create a new document.
  3. Give your document a title by clicking on the “Untitled document” text at the top of the page and typing in a new title.
  4. Set up your document’s layout by clicking on “File” in the menu bar and selecting “Page setup.” Here, you can adjust the page orientation, margins, and size to your liking.
  5. Customize your document’s theme by clicking on “File” in the menu bar and selecting “Change theme.” Choose a theme that fits the style and tone of your newsletter.

Once you have created your new document and set up its layout and theme, you are ready to start adding content to your newsletter. You can even use this format in popular newsletter provider services. Allowing you to design the perfect format for you to use on any platform.

Filed Under: How-To

beehiiv vs ConvertKit: Which One Should you choose?

November 6, 2023 by Matt Brady Leave a Comment

If you’re looking for an email marketing platform, you’ve probably heard of Beehiv and ConvertKit. Both platforms offer a range of features that can help you grow your email list and engage with your subscribers.

beehiiv is an all-in-one marketing platform that offers email marketing, landing pages, and automation tools. With Beehiv, you can create beautiful email campaigns, track your open and click-through rates, and segment your audience based on their interests and behaviors. beehiiv also offers a range of integrations with other marketing tools, including social media platforms and CRM software.

ConvertKit, on the other hand, is a platform that’s focused exclusively on email marketing. It’s designed to help bloggers, authors, and other creators build and manage their email lists. ConvertKit offers a range of features that can help you grow your list, including customizable opt-in forms and landing pages. It also offers automation tools that can help you segment your audience and send targeted email campaigns.

Features Comparison

When comparing Beehiv and ConvertKit, one of the most important factors to consider is the features offered by each platform. Both platforms offer a range of features designed to help you manage your email marketing campaigns effectively.

Beehiv offers a range of features, including:

  • Automated email campaigns
  • Customizable email templates
  • Landing pages
  • A/B testing
  • Advanced analytics
  • Boosts

ConvertKit also offers a range of features, including:

  • Automated email campaigns
  • Customizable email templates
  • Landing pages
  • A/B testing
  • Advanced analytics
  • Seamless integration with Sparkloops

Both platforms offer similar features, but beehiiv has a slight edge when it comes to landing page design. Beehiv’s landing page builder is more intuitive and user-friendly than ConvertKit’s, making it easier to create professional-looking landing pages.

When it comes to email templates, both platforms offer a range of customizable options. However, Beehiv’s templates are slightly more modern and visually appealing than ConvertKit’s.

In terms of analytics, both platforms offer advanced tracking and reporting features, allowing you to monitor the performance of your email campaigns in real time. However, Beehiv’s analytics dashboard is more user-friendly and easier to navigate than ConvertKit’s.

Overall, both beehiiv and ConvertKit offer a range of features designed to help you manage your email marketing campaigns effectively. While Beehiv has a slight edge when it comes to landing page design and email templates, ConvertKit’s features are also robust and reliable.

Pricing Comparison

Free Plans:

When looking at the free plans between Convertkit and beehiiv, you will see that beehiiv allows more subscribers. beehiiv has up to 2,500 subscribers for free, while ConvertKit allows up to 1,000 subscribers.

You can send unlimited emails with both, which is always a good feature.

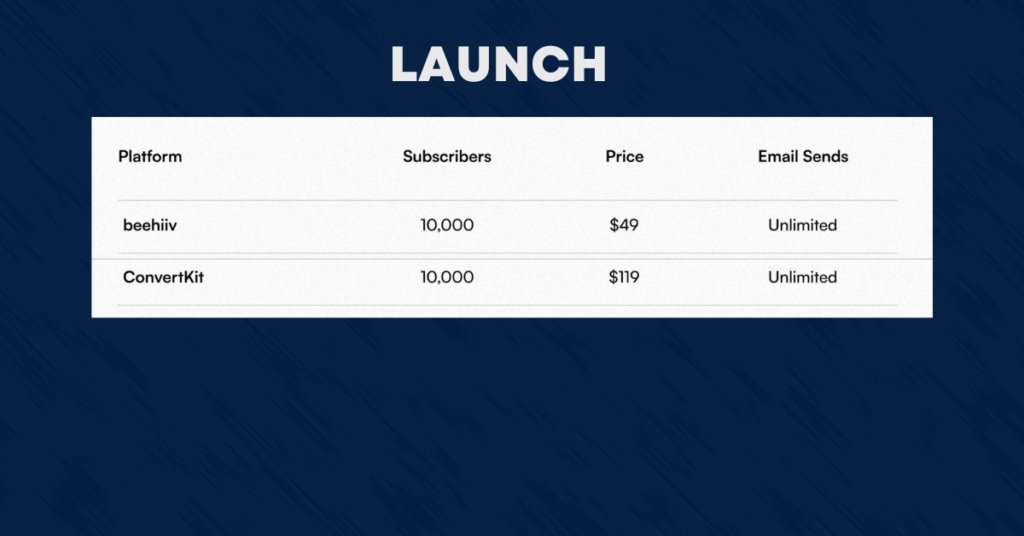
Launch Plan – 10,000 subscribers or less.

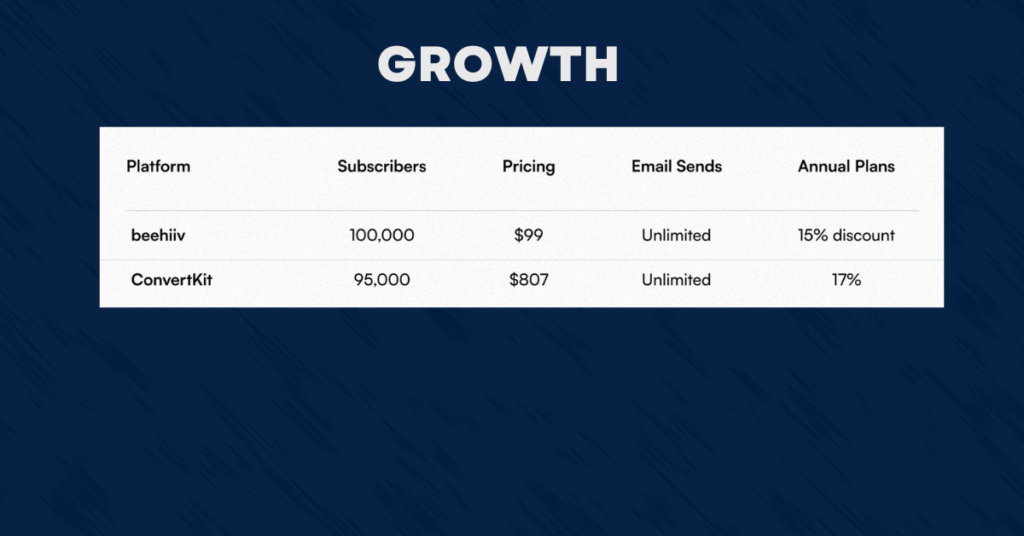
As the chart shares above, beehiiv is almost 50% cheaper than ConvertKit. ConvertKit does have one more tier that isn’t displayed in this graph, that is for the 1,000-3,000 tier subscriber count which costs around $41/month.

beehiiv has a generous price point of $49/month with unlimited email sends. ConvertKit has a higher price but overall you get more features with beehiiv and this doesn’t include the Growth Plan which is the highest tier and most features.

Growth – 100,000 Subscribers or less

ConvertKit doesn’t even display what the cost would be for 100,000 subscribers. This is why you see the chart stating that it’s 95,000 subscribers for $807 a month.

beehiiv has matched that and then some charging only $99/month or $999/year. This comes to be a 15% discount when buying for the year. Which is great incentive for you to look into beehiiv more.

The price for beehiiv in this plan is the best deal you will ever find. If you are someone who is looking to convert your subscribers to another email service provider, beehiiv is the best choice for you to start a newsletter.

Ease of Use

Both Beehiv and ConvertKit offer user-friendly interfaces that allow you to create and manage email campaigns with ease. However, there are some differences in the user experience between the two platforms.

Beehiv has a simple and intuitive interface that makes it easy for non-technical users to get started. The platform offers drag-and-drop functionality, allowing you to easily create email templates and landing pages. You can also use the platform to manage your contacts and segment them based on various criteria. Beehiv also offers a variety of integrations with other tools and platforms, making it easy to connect your email marketing efforts with your other marketing activities.

ConvertKit, on the other hand, has a slightly steeper learning curve. The platform is designed to be more powerful and flexible, offering advanced features such as automation rules and sequences. While these features can be useful for experienced marketers, they may overwhelm non-technical users.

Integrations

beehiiv

Both Beehiv and ConvertKit offer a variety of integrations to help you connect with other tools and services you use.

Beehiv integrates with popular apps such as Zapier, Stripe, and Google Sheets. Beehiv offers an open API that gives you access to more advanced integrations and customization options. You must be on a paid plan to access the API. This comes into account if you want to use a third-party website for your landing page like carrd.

If you use WordPress for your newsletter, you must use a third-party plugin to connect to beehiiv.

ConvertKit

ConvertKit has integrations with WordPress, Shopify, and Teachables.

It also offers direct integrations with popular social media platforms such as Facebook, Instagram, and YouTube.

ConvertKit’s API access allows you to build custom integrations with other tools and services.

Customer Support

beehiiv Customer Support

Beehiv’s customer support team is known for their quick response times and helpfulness. They offer 24/7 email support and live chat support during business hours.

Additionally, beehiiv has a comprehensive knowledge base that answers frequently asked questions and helpful guides for using the platform.

ConvertKit’s Customer Support

ConvertKit also offers email support and live chat support during business hours. They also have a knowledge base with helpful articles and guides.

However, some users have reported longer response times from ConvertKit’s support team compared to Beehiv’s.

Support is one of those topics that just has to be covered by any company and let’s face it most outsource this.

The good news with both Convertkit & beehiiv is they have amazing documentation and even video tutorials to help you with 99% of the issues you would face. You are sure to get a response within 24 hours but have heard some reviews that ConvertKit takes longer to respond.

Sparkloops Vs. Boosts

Convertkit bought Sparkloops earlier this year while beehiiv is building a similar product all in-house that they call Boosts.

The main difference between Sparkloops & Boosts is that Boosts must be sent within 72 hours. you are going to see him

beehiiv

beehiiv has boosts which are free money to your newsletter if used correctly.

Boosts are only available on the Grow plan but offer a good incentive for other newsletters to pay you for referrals.

How does it work?

You must first upgrade to the Growth Plan, if you haven’t already.

Then you can select newsletters to boost(It’s recommended to choose newsletters in your niche; this will get you a bigger payout).

After submitting your request to boost the newsletter can accept or reject it.

If accepted you have 72 hours to send out your latest newsletter article for the “boost” to work on.

You can sign up for as many as you wish but not everyone will accept you.

ConvertKit

ConvertKit’s sponsorship program, called the ConvertKit Sponsor Network, allows users to earn a recurring commission for every new customer they refer to ConvertKit. The commission rate starts at 30% and can increase up to 50% based on the number of customers referred. ConvertKit also offers a referral program where users can earn a one-time commission for each new customer they refer to ConvertKit.

Who Should You Pick? beehiiv or ConvertKit

Both beehiiv and ConvertKit offer great email marketing solutions for businesses of all sizes.

beehiiv is a more affordable option with a wide range of features that can help you manage your email campaigns effectively. It offers advanced segmentation and automation capabilities, making it easier to target specific audiences with personalized content.

On the other hand, ConvertKit is a more expensive option, but it offers more advanced features for bloggers and content creators. It has a user-friendly interface and allows you to create landing pages and forms easily.

Ultimately, the choice between beehiiv and ConvertKit will depend on your specific needs and budget. If you’re a small business with a limited budget, beehiiv is an excellent option. If you’re a blogger or content creator looking for more advanced features, ConvertKit may be the better choice. But Beehiiv is pumping out new features at a fantastic rate so the gap is closing.

If I were to start a newsletter today, I would have to go with beehiiv as the upside potential is there more than with ConvertKit.

Filed Under: Comparision

How to Create a Newsletter on Microsoft Word: Step-by-Step Guide

November 5, 2023 by Matt Brady Leave a Comment

To create a newsletter on Microsoft Word, you don’t need to be a design expert or have any prior experience with graphic design software. With a few easy steps, you can create a professional-looking newsletter that you can share with your audience.

Let’s take a look at how to setup your newsletter template

Setting Up Microsoft Word

To create a newsletter on Microsoft Word, you must set up your document correctly. Follow these steps to get started:

  1. Open Microsoft Word and create a new document.
  2. Click on the “Page Layout” tab and select “Orientation” to choose between portrait or landscape mode.
  3. Next, select “Size” to choose the size of your document. A common size for newsletters is 8.5 x 11 inches.
  4. Click on “Margins” to set the margins for your document. A good margin size for newsletters is 0.5 inches on all sides.
  5. Once you have set up the orientation, size, and margins, you can add a header and footer to your document. Click on the “Insert” tab and select “Header” or “Footer” to add your desired text.
  6. You can also add a cover page to your newsletter by selecting “Insert” and then “Cover Page”. Choose a design that suits your newsletter’s theme.
  7. Lastly, save your document so you can access it later.

By following these steps, you can set up your Microsoft Word document for creating a professional-looking newsletter. This will generate the template you can use for all newsletters.

How To Choose A Built-In Template

When creating a newsletter in Microsoft Word, choosing the right template can make all the difference. Microsoft Word makes it very easy to find the built in templates which is great to give yourself a starting point when making your newsletter template.

Follow These steps to access the templates:

  1. Click on “File” – > “New” – This opens a new document
  2. Select “Newsletters”
  3. Pick the template that fits your needs.
  4. Start adding content

If Microsoft Word doesn’t give you the newsletter template you always wanted, keep reading.

Use External Microsoft Word Templates.

There are plenty of websites that provide you with Free Word templates for your newsletter along with quiet a powerful amount of paid templates.

Here are some that we recommend:

  1. LayoutReady – They have 100’s of newsletter templates to choose from
  2. Vertex42 – Specifically only for Microsoft Word.
  3. WordDraw – A Good collection of industry-specific newsletter templates like teachers, businesses, and Holidays.

How to Customize the Template

Once you have selected a template for your newsletter, you can customize it to suit your needs. Here are a few ways you can customize it:

  • Change Text – You can use a different font, size, color.
  • Images – Add more to the newsletter with images from copyright-free sources like Unsplash
  • Headers – Underline Headers to stand out or simply change the color.

Adding Content

Once you have selected a template for your newsletter, it’s time to start adding content. This section will cover the three main components of a newsletter: headlines, body text, and images.

Creating Engaging Headlines

The headline is the first thing your readers will see, so it’s important to make it engaging and informative. Here are a few tips for creating headlines that grab attention:

  • Keep it short and sweet: Aim for 10 words or less.
  • Use action words: Verbs like “discover,” “learn,” and “explore” can make your headline more compelling.
  • Be specific: If your newsletter includes a feature article, mention it in the headline.

Writing Informative Body Text

The body of your newsletter should provide valuable information to your readers. Here are some tips for writing informative body text:

  • Keep it concise: Use short paragraphs and avoid wordy sentences.
  • Use subheadings: Break up your text with subheadings to make it easier to read.
  • Provide value: Your readers should feel like they’re getting something out of your newsletter, whether it’s information, entertainment, or both.

Including Relevant Images

Images can make your newsletter more visually appealing and help to break up the text. Here are some tips for including images in your newsletter:

  • Use high-quality images: Blurry or pixelated images can detract from your newsletter’s professional appearance.
  • Choose relevant images: Your images should be related to the content of your newsletter.
  • Use captions: Captions can provide additional information about the image and help to break up the text.

By following these tips, you can create a newsletter that engages your readers and provides them with valuable information.

Proofreading and Editing

Now that you have created your newsletter in Microsoft Word, it is important to proofread and edit it thoroughly before sending it out to your readers. Here are a few tips to help you ensure that your newsletter is error-free and easy to read:

  • Read it aloud: Reading your newsletter out loud can help you catch errors that you might have missed while reading silently. This can also help you identify awkward phrasing or sentences that need to be reworded.
  • Use the spelling and grammar checker: Microsoft Word has a built-in spelling and grammar checker that can help you catch errors. Make sure to run the checker before sending out your newsletter.
  • Check for consistency: Make sure that your newsletter is consistent in terms of formatting, tone, and style. This can help make your newsletter look more professional and polished.
  • Get a second opinion: Ask a friend or colleague to read over your newsletter and provide feedback. This can help you catch errors that you might have missed and get a fresh perspective on your writing.

By following these tips, you can ensure that your newsletter is error-free and easy to read for your audience.

Saving and Exporting the Newsletter

Once you have created your newsletter in Microsoft Word, you will need to save and export it in the appropriate format. Here are the steps to follow:

  1. Save the document: Click on the “Save” button in the top left corner of the screen or press “Ctrl + S” on your keyboard. Choose a name and location for your file and click “Save.”
  2. Export the document: Click on the “File” tab in the top left corner of the screen. Select “Export” from the menu. Choose “Create PDF/XPS Document” or “Change File Type” depending on your needs.
  3. Choose the file type: If you are exporting your newsletter as a PDF, select “PDF” from the list of file types. If you are exporting it as a Word document, select “Word Document” from the list.
  4. Choose the location: Choose a location to save your file and click “Export.”
  5. Check the file: Once the export is complete, open the file to make sure everything looks correct. Check for any formatting issues or missing images.
  6. Distribute the newsletter: You can now distribute your newsletter to your intended audience. You can email it as an attachment or upload it to your website for download.

By following these steps, you can create a professional-looking newsletter in Microsoft Word and easily save and export it in the appropriate format.

Distributing the Newsletter

Once you have created your newsletter in Microsoft Word, it’s time to distribute it to your audience. We recommend signing up for beehiiv. beehiiv is an all in one newsletter platform that allows you to customize the entire experience of your subscribers.

-> CLICK HERE TO SIGN UP FOR BEEHIIV TODAY <-

Or read the review

If you aren’t looking to do the email route, you can even print these newsletters to share with an audience in person or publish to a social media account. No matter what you choose it’s important to share your hard work.

Related Articles:

  • How To Start A Newsletter
  • How to Grow A Newsletter
  • How To Monetize A Newsletter

Filed Under: How-To

How to Create a WordPress Newsletter: A Step-by-Step Guide

November 2, 2023 by Matt Brady Leave a Comment

If you want to create a newsletter on WordPress, you’re in the right place. With over 333 billion emails sent and received every day worldwide, it’s clear that email communication is still a vital part of our lives. Email is more popular than social media or other messaging apps in the United States, with 92% of the population using it.

Starting A Newsletter has become easier over the years, as someone who loves WordPress and uses it for this blog. I understand the needs and want to use WordPress for your newsletter.

We will break down exactly how you can get a newsletter up and running in less than 20 minutes.

But first, we need to start with the basics.

What is a newsletter?

If you’re looking to inform your subscribers about specific news, such as the release of a new blog post, the organization of an event, a promotion on one of your products or services, etc., then a newsletter is what you need. A newsletter is simply an email sent to your subscribers to inform them.

Want to learn more about newsletters? Check out our post on What Is a newsletter where we talk about exactly what newsletters are in more details.

Now, Let’s make a newsletter using WordPress.

Create Your Newsletter

You first need to Install WordPress and get your website set up.

Step 1. ->Click Here To Sign Up For Bluehost <-

If you are looking to get started with your newsletter on WordPress, it is recommended to use a third-party hosting service. The Newsletter Life uses Bluehost and is one of the top companies for hosting your website.

It only costs $2.95/month and includes a free domain.

Once you sign up and create an account, follow the instructions from Bluehost to get your blog up and running; if you have any trouble, follow this guide or contact me with any questions.

Step 2. Sign Up For Email Service Provider

Now that your blog is set up, you must decide what email service provider to use.

We recommend Email Octopus. It will cost you nothing for your first 2,5000 subscribers and they have excellent forms you can use(Follow the steps below).

-> Click Here to Create a FREE Email Octopus Account <-

Step 3. Create Your Email Subscriber Form.

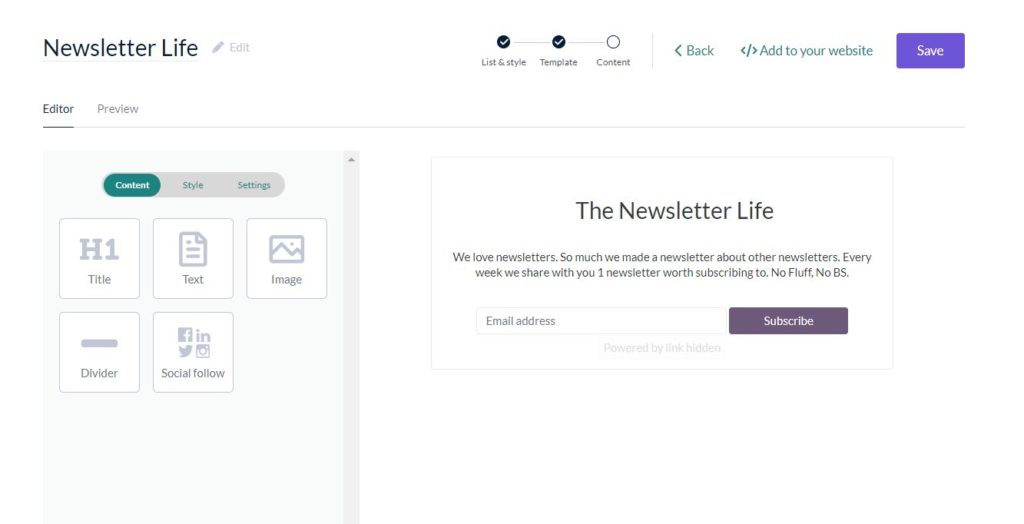
After creating the account, it’s straightforward to get a subscriber form created.

Landing Page & Forms – > Create – > Select “Form”

You should then follow the steps, and you will see something like this.

Step. 4 – Add to blog posts

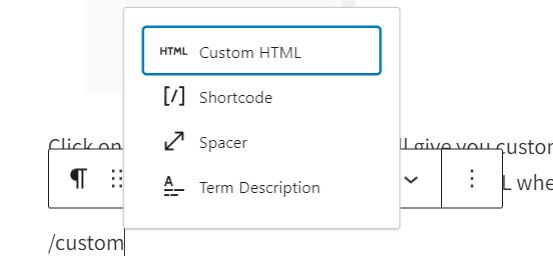
Click on Add to your website, and it will give you a custom code you can enter into your WordPress blog(Make sure to select custom HTML when using WordPress)

That’s it. You now have a form using WordPress.

You can add this to your homepage or use a plugin like Advanced Ads to display your form in certain page sections.

If the full blog isn’t for you, you can look into WordPress Plugins focused on Newsletters. There are quiet a few.

How to Make a Newsletter on WordPress with a Plugin

Using a plugin is a great option if you want to create a newsletter on your WordPress site. Here are some of the most popular newsletter plugins available on the official WordPress directory:

  • MailPoet (700K+ active installations)
  • Newsletter (300K+ active installations)
  • MailOptin (30K+ active installations)
  • Mailjet (20K+ active installations)
  • AcyMailing (7K+ active installations)
  • Jackmail (active installations)

MailPoet is the most popular newsletter plugin, but there are other options to choose from as well.

When deciding which plugin to use, consider factors such as ease of use, user reviews, frequency of updates, overlap with your needs, and price (many have free versions with limitations on email sending).

It’s also essential to consider deliverability, which can be difficult to test without actually sending emails. Look for a plugin that offers its own sending service or allows you to configure an SMTP server, rather than relying on the native WordPress email sending function.

MailPoet doesn’t use the WordPress email-sending function like other plugins on this list. Which is an important aspect.

MailPoet has its own email sending system and is set directly on the WordPress content editor (Gutenberg). To learn how to configure and use these plugins, check out our dedicated tutorials for MailPoet.

If neither of these plugins meets your needs, you can also try out the free versions of other plugins listed above. Additionally, there is a unique plugin called Newsletter Glue that allows you to write and publish newsletters directly from the WordPress content editor. However, it requires connecting to an emailing service and has fewer options than MailPoet.

Frequently Asked Questions

What are some of the best WordPress newsletter plugins available?

If you’re looking for a WordPress newsletter plugin, there are many options available. Some of the best plugins include:

  • MailPoet
  • Newsletter
  • Sendinblue
  • Mailchimp

These plugins offer a range of features, including customizable templates, automated email campaigns, and list management tools. You can choose the one that best fits your needs and budget.

How can you create a custom newsletter template in WordPress?

Creating a custom newsletter template in WordPress is easy with the right tools. You can use a plugin like MailPoet or Newsletter to create a template from scratch, or you can use a pre-designed template and customize it to fit your needs. To create a custom template, you will need to have some basic knowledge of HTML and CSS.

What are some free WordPress newsletter plugins?

If you’re looking for a free WordPress newsletter plugin, there are many options available. Some of the best free plugins include:

  • MailPoet
  • Newsletter
  • Sendinblue
  • Mailchimp

These plugins offer a range of features, including customizable templates, automated email campaigns, and list management tools. While some of these plugins have premium versions with more features, the free versions are still very powerful.

How do you create a newsletter signup form on your WordPress site?

Creating a newsletter signup form on your WordPress site is easy with the right plugin. You can use a plugin like MailPoet or Newsletter to create a signup form and add it to your site using a shortcode or widget. You can customize the form to include fields for name, email address, and other information.

What are some popular WordPress newsletter templates?

There are many popular WordPress newsletter templates available, both free and premium. Some of the most popular templates include:

  • Astra
  • Divi
  • OceanWP
  • Hestia

These templates offer a range of styles and designs, and you can customize them to fit your branding and content.

How can you create a professional-looking newsletter using WordPress?

To create a professional-looking newsletter using WordPress, you will need to choose a quality newsletter plugin and template. You can customize the template to fit your branding and content and use the plugin to manage your email list and send out your newsletter. With the right tools and design, you can create a newsletter that looks great and engages your audience.

Filed Under: How-To

Create a Winning Newsletter Landing Page with Carrd

October 31, 2023 by Matt Brady Leave a Comment

If you’re looking to create a newsletter landing page, you might be overwhelmed by the variety of options available. However, Carrd is an excellent platform to consider. With its user-friendly interface and customizable templates, Carrd makes it easy to create a landing page that will effectively promote your newsletter.

Carrd offers a range of templates specifically designed for landing pages, including those for newsletters. These templates are fully customizable, so you can adjust them to fit your specific needs.

You can add your own content, images, and branding to create a page that reflects your unique style and message. Additionally, Carrd’s drag-and-drop interface makes it easy to rearrange elements and create a layout that works for you.

One of the key benefits of using Carrd for your newsletter landing page is its affordability. Carrd offers a free plan, which allows you to create up to three sites. While this plan is limited in features, it’s an excellent option if you’re starting out and want to test the waters. If you upgrade to a paid plan, you can access additional features, such as custom domains and more templates, for only $9/year. Making it one of the best landing page builders out there.

Understanding Carrd

Carrd is a website builder that allows you to create landing pages and websites with ease. The platform is known for its simplicity and ease of use, making it a popular choice for people who want to create a landing page quickly.

Carrd offers a variety of templates to choose from, which can be customized to fit your needs. The templates are designed to be visually appealing and easy to navigate, making it easier for your visitors to find what they want.

One of the key features of Carrd is its drag-and-drop editor, which makes it easy to add and rearrange elements on your landing page. You can add text, images, buttons, forms, and more with just a few clicks.

Another great feature of Carrd is its integration with third-party tools. You can connect your landing page to services like Mailchimp, Google Analytics, and more.

Carrd also offers a variety of pricing plans, including a free plan that allows you to create a basic landing page. The paid plans offer more advanced features, such as custom domains, A/B testing, and more.

Why Use Carrd for Newsletter Landing Page

If you’re looking to create a newsletter landing page, Carrd is an excellent choice. Here are a few reasons why:

Easy to Use

Carrd is a user-friendly platform that makes it easy to create a landing page without any prior coding experience. The drag-and-drop interface allows you to add and customize elements quickly, and the platform offers a variety of templates to choose from.

Affordable

Carrd is an affordable option for creating a newsletter landing page. The platform offers a free plan that includes basic features, and the paid plans are reasonably priced. This makes it an excellent choice for individuals or small businesses on a budget.

Customizable

Carrd offers a high level of customization for your landing page. You can choose from a variety of templates and customize them to fit your brand’s look and feel. You can also add custom CSS and HTML to customize your landing page further.

Mobile-Friendly

With more and more people accessing the internet on their mobile devices, it’s essential to have a mobile-friendly landing page. Carrd’s templates are all mobile-responsive, meaning they will look great on any device.

Setting Up Your Carrd Landing Page

Creating a Newsletter Landing Page with Carrd is a simple and straightforward process. Follow these steps to set up your landing page.

Sign up for Carrd

-> CLICK HERE TO SIGN UP FOR CARRD <-

To begin, you need to register on Carrd. Go to the Carrd website and click on the “Sign Up” button. You will be asked to enter your email address and create a password. Once you have done that, click on the “Sign Up” button again.

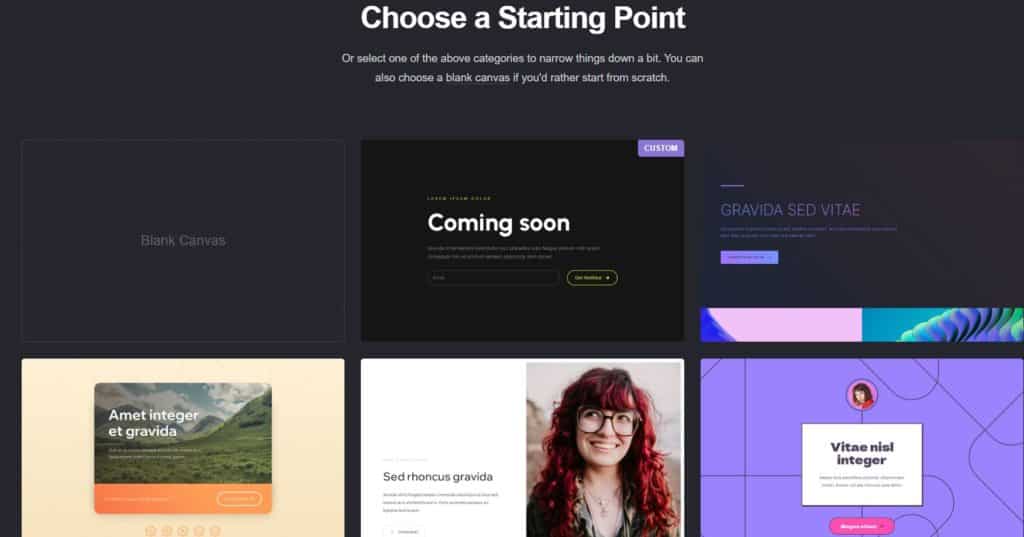
Choosing a Template

After you have registered, you will be taken to the Carrd dashboard. From there, you can choose a template for your landing page. C

Carrd offers a variety of templates that you can choose from, depending on the type of landing page you want to create.

Once you find a template that suits your needs, click the “Select” button.

Customizing Your Template

Once you have chosen a template, you can start customizing it. Carrd has a drag-and-drop interface that makes it easy to add and remove elements from your landing page.

You can add text, images, buttons, and more. You can also change the colors and fonts to match your brand.

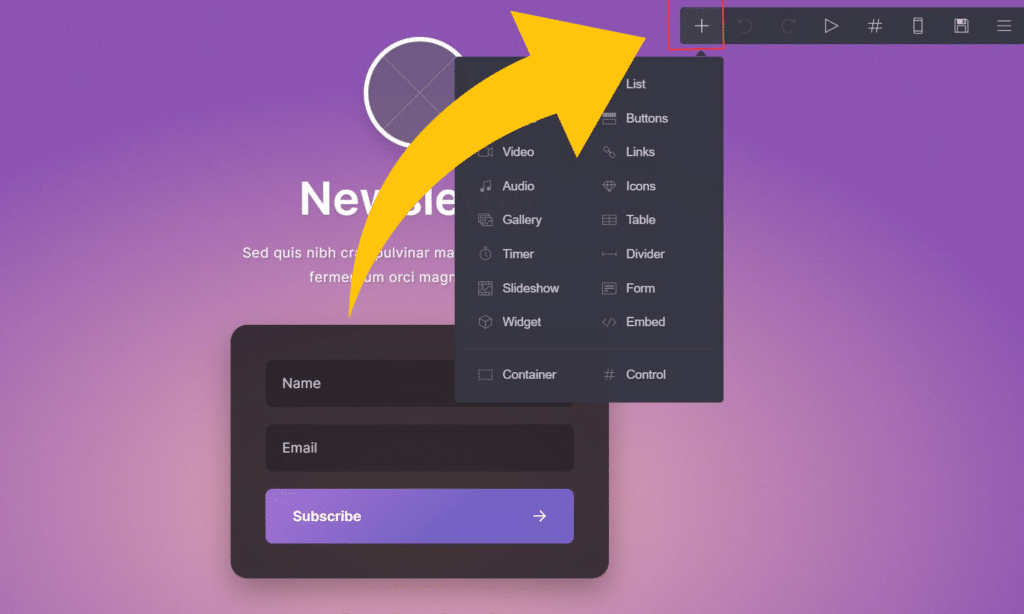
To add an element, simply click on the “+” button on the right-hand side of the screen. You can then choose the type of element you want to add from the menu that appears. To remove an element, click on it and then click on the “Trash” icon that appears.

To change the colors and fonts, click on the “Design” tab at the top of the screen. You can choose a color scheme and font matching your brand from there.

That’s it! With these simple steps, you can create a professional-looking Newsletter Landing Page with Carrd.

Integrating Newsletter Service

If you plan to use your newsletter landing page to collect email addresses, you must integrate a newsletter service with your Carrd site. This will allow you to store and manage the email addresses you collect through your landing page.

You must add a form by hitting the + button on the top right.

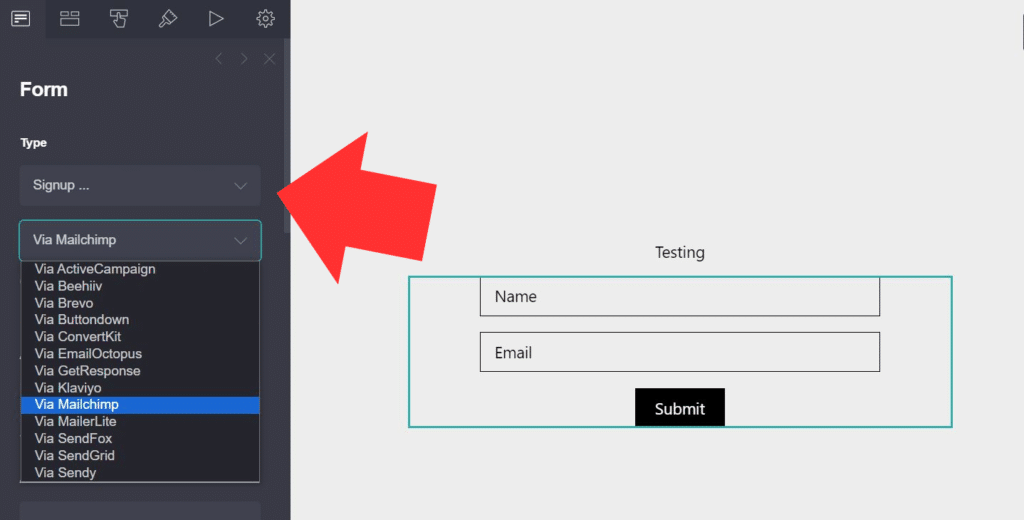
When you select the form, you can integrate it with all of the following:

  • beehiiv
  • ConvertKit
  • EmailOctopus
  • Sendy
  • GetResponse

Choosing a Newsletter Service

Several newsletter services are available, and each has its own features and pricing plans. Some popular options include:

  • beehiiv
  • ConvertKit
  • Constant Contact
  • AWeber
  • GetResponse

When choosing a newsletter service, consider the following factors:

  • Cost: Look for a service that fits your budget and offers desired features.
  • Features: Consider the needed features, such as automation, segmentation, and analytics.
  • Ease of use: Choose a service that is easy to use and has a user-friendly interface.
  • Integration: Look for a service that integrates with Carrd or provides a custom HTML form to embed on your landing page.

Linking Newsletter Service to Carrd

Once you have chosen a newsletter service, you must link it to your Carrd site. This can usually be done by copying and pasting a code snippet or embedding a form on your landing page.

To link your newsletter service to Carrd:

  1. Log in to your newsletter service account and create a new email list or audience.
  2. Generate a code snippet or form code to embed on your landing page.
  3. In Carrd, add a new form element to your landing page.
  4. Paste the code snippet or form code into the form element.
  5. Customize the form fields and design to match your landing page.
  6. Test the form to ensure that it is working correctly.

By integrating a newsletter service with your Carrd landing page, you can build an email list and stay in touch with your subscribers. With the right service and integration, you can automate your email marketing and grow your business.

Optimizing Your Landing Page

When it comes to creating a newsletter landing page with Carrd, there are a few things you can do to optimize it for maximum impact. Here are some tips to help you get the most out of your landing page.

SEO Best Practices

Optimizing your landing page for search engines is an integral part of driving traffic to your site. Here are some best practices to keep in mind:

  • Use relevant keywords in your page title, meta description, and content.
  • Include alt tags for all images on your landing page.
  • Use descriptive URLs that include your keywords.
  • Ensure your landing page is mobile-friendly (more on this below).
  • Use internal linking to other relevant pages on your site.

By following these SEO best practices, you can improve your landing page’s visibility in search engine results pages (SERPs) and drive more traffic to your site.

Mobile Optimization

With more and more people accessing the internet on their mobile devices, your landing page must be optimized for mobile users. Here are some tips to help you create a mobile-friendly landing page:

  • Use a responsive design that adjusts to different screen sizes.
  • Keep your content concise and easy to read on smaller screens.
  • Use large, easy-to-click buttons and links.
  • Optimize your images for faster loading times.
  • Test your landing page on multiple devices to ensure it looks and functions correctly.

By optimizing your landing page for mobile users, you can ensure that you’re reaching the widest possible audience and making it easy for them to sign up for your newsletter.

In conclusion, optimizing your newsletter landing page with Carrd is an essential step in driving traffic to your site and growing your subscriber list. By following these tips for SEO best practices and mobile optimization, you can create a landing page that’s both effective and user-friendly.

Analyzing Performance

Once your newsletter landing page is up and running, you’ll want to track its performance to see how well it’s doing. Here are some tips on how to analyze your landing page’s performance.

Using Analytics Tools

One of the best ways to track your landing page’s performance is to use an analytics tool such as Google Analytics. This tool will give you insights into how many people are visiting your landing page, where they’re coming from, and how long they’re staying on your page.

With Google Analytics, you can also set up goals to track specific actions on your landing page, such as signing up for your newsletter or clicking on a link. This will help you measure the success of your landing page and make any necessary adjustments to improve its performance.

Interpreting Data

Once you have data from your analytics tool, it’s important to interpret it correctly. Here are some key metrics to look out for:

  • Bounce rate: This is the percentage of people who leave your landing page without taking any action. A high bounce rate could mean that your landing page isn’t engaging enough or that it’s not meeting your audience’s expectations.
  • Conversion rate: This is the percentage of people who take a desired action on your landing page, such as signing up for your newsletter. A low conversion rate could mean your landing page needs to be optimized to encourage visitors to take action.
  • Traffic sources: This will show you where your visitors are coming from, such as social media or search engines. This information can help you tailor your marketing efforts to reach your target audience more effectively.

By paying attention to these metrics and making adjustments as necessary, you can improve the performance of your newsletter landing page and increase your chances of success.

Conclusion

In conclusion, creating a newsletter landing page with Carrd is a simple and effective way to promote your newsletter and grow your subscriber list. With Carrd’s user-friendly interface and customizable templates, you can quickly create a landing page that reflects your brand and engages your audience.

By following the best practices outlined in this article, such as using clear and concise copy, including social proof, and optimizing your call-to-action, you can increase your conversion rates and attract more subscribers to your newsletter.

Regularly update your landing page with fresh content and test different elements to see what works best for your audience. With Carrd’s analytics and A/B testing features, you can easily track your performance and make data-driven decisions to improve your results.

Filed Under: guide

SparkLoop Review: The Best Email Referral Tool for Growing Your Business

October 31, 2023 by Matt Brady Leave a Comment

Are you looking for ways to earn passive income from your newsletter? Thankfully, this SparkLoop review will give you the perfect things to look at s is good for the boys as they had everything in.

While Sparkloop has pros and cons, it can become an additional income source that does not take up much of your time. However, if your email list is small, you won’t earn much.

TL;DR Sparkloop

Sparkloop is a newsletter referral program that helps content creators and businesses grow their email lists by incentivizing subscribers to refer others to their newsletter. It is rated 3/5 based on 19 reviews on Product Hunt.

Pricing

Sparkloop offers a 7-day free trial for its newsletter growth features, with pricing starting at $99 a month. For paid recommendations, SparkLoop withholds a 20% commission plus a small processing fee on your monthly payouts.

Integrations

Sparkloop can be integrated with over 30 email software products. If you have over 30k subscribers, you can discuss custom integration with the Sparkloop team.

Partner Program

Anyone can join the Sparkloop Partner Program, integrate their email software product with Sparkloop. Depending on the email list size, you can make $100 on Sparkloop. The minimum withdrawal threshold is $50 via Stripe.

Best for

Sparkloop is best for anyone who has a newsletter with 1,000+ subscribers.

Cons

Just because a user signs up using your link doesn’t mean you will earn. Most newsletters only want US, UK, and Canada subscribers, leaving other countries behind. You give them a free subscriber without them having to pay you.

Some newsletters also require an open within X days to be paid. If the subscriber is in the correct country but doesn’t open X newsletters in an X period, you won’t get anything for them.

What is Sparkloop?

Sparkloop is a platform that helps newsletter creators expand their subscriber base. With Sparkloop, you can easily create a referral program, track referrals, and distribute rewards. It’s a customizable solution that can be integrated with various email marketing platforms.

Sparkloop Integration with Convertkit

If you’re a Convertkit user looking for new ways to monetize your newsletter, Sparkloop may be worth checking out. The Convertkit Creator Network allows content creators to recommend each others’ newsletters for free, which can help grow your subscriber list. However, if you’re looking for paid opportunities, Sparkloop offers a way to recommend other newsletters to your subscribers automatically.

The registration process for Convertkit users is straightforward, and there is a guide available on how to enable paid recommendations in the Creator Network. To start recommending paid newsletters, all you need to do is add your identification number to your Convertkit landing page or form. This identification number is provided to you after registering on Sparkloop.

Once you’ve added your identification number, your subscribers will see newsletter recommendations based on your choices. To choose what to recommend, you can use the Sparkloop Upscribe recommendation widget.

Sparkloop Upscribe

Sparkloop Upscribe is a newsletter recommendation widget that can be added to your opt-in forms to recommend preferred newsletters. You can choose multiple partner newsletters to recommend, but only five newsletters will be recommended at a time. This is done to optimize for maximum output.

To use Sparkloop Upscribe, you first need to select partner newsletters potentially engaging to your target audience. Once you have chosen the newsletters, you can customize the Upscribe pop-up form by adding a header, subheader, CTA, and skip link. After making the necessary changes, you can save them and integrate your email software provider if you haven’t done it yet.

When subscribers join your email list, they will see the recommended newsletters only if they come from a geographically unrestricted country. It is important to note that most newsletter owners are willing to pay for subscribers from the USA, UK, and Canada. Therefore, it is recommended to check the requirements of every paid newsletter.

It is advisable to have 12 active newsletter promotion campaigns that you regularly review to decide whether it is worth promoting them. You won’t know what works for you unless you try various paid newsletter recommendations and see how your audience reacts. It’s a trial-and-error experience.

Sparkloop Magic Links

If you are looking for an effective way to gain new referrals, Sparkloop Magic Links might be the solution you need. Along with Sparkloop Upscribe, Magic Links are another great tool to promote paid newsletters.

With Magic Links, subscribers can sign up for your newsletter with just one click without going through a landing page. This makes the process much faster and more convenient for your followers.

To use Magic Links, include them in your newsletter with an enticing description. Based on the experience of others, a 4% click rate is achievable, which translates to roughly 150+ clicks for a list of 1,100+ subscribers.

By using Magic Links, you can increase your subscriber base and promote paid recommendations more efficiently. It is recommended that you regularly update your recommendations to ensure that your followers receive the most helpful and relevant information.

How much you can earn with Sparkloop

Your earnings on Sparkloop depend on the size of your email list and how many new subscribers you get per day.

The more people see your paid recommendations and subscribe, the more you earn.

For example, if you get roughly 10 new subscribers per day, those ten subscribers will be promoted with Upsribe, allowing you to net profits or break even.

The good news is you don’t just use upsribe for your newsletter. You can also have a fully functioning site that links your ID’s. Allowing you to earn in the email’s themselves.

Sparkloop Pricing

If you’re looking to integrate your newsletter and promote paid recommendations, Sparkloop is free. However, if you want to use it as a newsletter growth platform, you can pay $1-$2 per acquired subscriber. It’s recommended to test this option with a small budget before scaling it up since the quality of subscribers is unknown.

Alternatively, you can try Sparkloop’s Solo Creator for $99/month or Media Brand for $299/month plans. These plans offer various newsletter growth features, such as a referral program. Beehiiv also offers a referral program and a Boosts feature for $99/month.

Sparkloop Review: FAQ

If you’re considering joining Sparkloop, you might have questions about the platform. Here are some of the most common questions people ask about Sparkloop:

Is Sparkloop worth it for small newsletter publishers?

Sparkloop is best suited for newsletter publishers with 1,000+ subscribers. If you have a smaller email list, you may not earn as much income from promoting paid newsletters on Sparkloop. However, if you want to grow your newsletter audience and monetize your content, Sparkloop can be a powerful tool.

How much money can I make on Sparkloop?

Your earnings on Sparkloop will depend on the size of your email list and how many new subscribers you get daily. However, Sparkloop estimates that most publishers earn $50+ monthly from promoting paid newsletters on their platform.

What email software can I integrate with Sparkloop?

Sparkloop can be integrated with over 30 email software products, including Convertkit, Beehiiv, Campaign Monitor, Hubspot, Drip, Mailchimp, Mailer, Marketo, PostUp, SendGrid, AWeber, and Active Campaign. The list is constantly growing, so be sure to check the latest information on the website.

Can I get custom integration with Sparkloop if I have over 30k subscribers?

Yes, if you have over 30k subscribers, you can discuss custom integration with the Sparkloop team.

How does Sparkloop compare to Beehiiv Boosts?

Sparkloop and Beehiiv Boosts are paid newsletter recommendation platforms that allow newsletter publishers to promote their newsletters to the audiences of other newsletter publishers. However, Sparkloop is the more powerful and feature-rich solution. At the same time, Beehiiv Boosts is a good option if you are on a budget or just getting started with paid newsletter recommendations.

That’s it for our Sparkloop FAQ! If you have any other questions, please leave a comment below or DM me on Twitter.

Filed Under: Best News Letters

  • « Go to Previous Page
  • Page 1
  • Page 2
  • Page 3
  • Page 4
  • Page 5
  • Interim pages omitted …
  • Page 14
  • Go to Next Page »

Primary Sidebar

Steps For Building Your Newsletter

Step 1: Get Started

Step 2: Setup Your Newsletter

Step 3: Setup your newsletter email list

Step 4: Create a killer landing page

Step 5: Create your first newsletter campaign

Step 6: Send your newsletter

Click Here To Start A Newsletter For Free

Copyright © 2025 · The Newsletter Life
Home | About Me | Advertise | Privacy Policy